In today’s connected world, every smartphone has a unique MAC address (Media Access Control address). It is a hardware identifier for your phone’s Wi-Fi and sometimes Bluetooth. It looks like this: 00:1A:2B:3C:4D:5E (12 hexadecimal characters separated by colons).
You may need your phone’s MAC address for:
- Registering on college, office, or hostel Wi-Fi networks (MAC filtering).
- Troubleshooting network issues.
- Setting up MAC address filtering on your home router for better security.
- Device identification or technical support.
- Privacy and security checks.
Here are the step-by-step instructions to find the MAC address of your mobile device. These methods work on most Android smartphones and iPhones, allowing you to view your Wi-Fi MAC address through the device settings.
What is MAC Address and Why Does It Matter?
- Wi-Fi MAC Address: Used when your phone connects to Wi-Fi.
- Bluetooth MAC Address: Used for Bluetooth connections (less commonly needed).
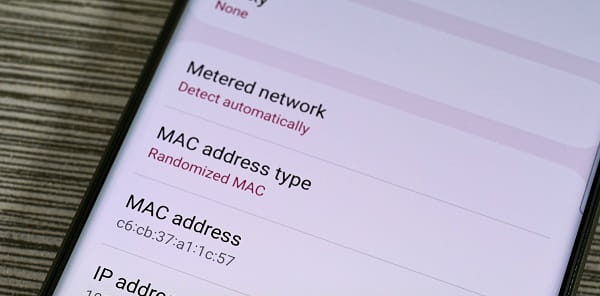
- Modern phones (Android 10+ and iOS) use Randomized MAC addresses (Private Wi-Fi Address) for privacy. This means the address changes for different networks to prevent tracking. You can usually switch to the real “Device MAC” if needed.
Note: MAC addresses are local to your network and cannot be used to track you over the internet.
How to Check MAC Address on Android Phones
Android steps vary slightly by brand (Samsung, Xiaomi, Realme, OnePlus, Vivo, Oppo, etc.), but the general path is similar.
Method 1: Through Settings (Most Common)
- Open the Settings app (gear icon).
- Scroll down and tap About phone (or About device).
- Tap Status or Status information.
- Look for Wi-Fi MAC address, Device Wi-Fi MAC address, or MAC address.
Alternative Paths (Brand-Specific)
- Samsung Galaxy: Settings → About phone → Status information → Wi-Fi MAC address.
- Xiaomi / Redmi / Poco: Settings → About phone → All specs or Hardware info → Wi-Fi MAC address.
- Google Pixel / Stock Android: Settings → About phone → Device identifiers → Device Wi-Fi MAC address.
- Other brands: Try Settings → Connections → Wi-Fi → Tap the gear icon next to a network → Advanced or View more → MAC address.
Using Connected Wi-Fi Network
- Go to Settings → Wi-Fi.
- Tap the gear/icon (i) next to your connected network.
- Scroll down to see the current MAC address (it may be randomized).
To Use Device (Permanent) MAC:
- In Wi-Fi network details, look for MAC address type or Use device MAC and select it.
How to Check MAC Address on iPhone (iOS)
Apple makes it very straightforward.
Main Method
- Open the Settings app.
- Tap General.
- Tap About.
- Scroll down and find Wi-Fi Address. This is your MAC address.
For a Specific Wi-Fi Network (Private Address)
- Go to Settings → Wi-Fi.
- Tap the blue “i” icon next to the connected network.
- You will see Wi-Fi Address (this may be the private/randomized one).
To Disable Private Address (for using real MAC):
- In the same network details screen, turn off Private Wi-Fi Address.
Other Easy Ways to Find MAC Address
- Dialer Code (Limited Android phones): Some older devices support *##4636##*` (This opens Testing menu → Wi-Fi information). Not reliable on all new phones.
- Third-party Apps: Search for “IP & MAC Address” or “Network Info” on Play Store. Apps like “Find My IP & MAC Address” show details easily. Be careful and choose well-rated apps.
- Router Admin Page: Log into your Wi-Fi router (usually 192.168.0.1 or 192.168.1.1) and check connected devices list. Your phone’s name and MAC will appear.
- Bluetooth MAC: In Android — Settings → About phone → Status → Bluetooth address. On iPhone — Settings → General → About → Bluetooth.
Common Scenarios in India Where You Need MAC Address
- College/hostel Wi-Fi registration (many universities require it).
- Broadband providers or office networks with MAC binding.
- Fixing “Cannot connect to Wi-Fi” issues.
- Parental controls or device management.
- Selling or buying used phones (to verify device info).
Important Tips for Users
- Randomization Feature: Always check if you need the real hardware MAC. For most registrations, turn off Private/Random MAC.
- Dual SIM Phones: MAC address is for the device, not per SIM.
- After Factory Reset: The address remains the same (hardware-based).
- Security Note: Never share your MAC address publicly. Only give it to trusted networks or support teams.
- Battery & Performance: Using randomized MAC is better for privacy and recommended by default.
- If Steps Don’t Match: Phone brands update their settings menu. Search “MAC address [your phone model]” on Google for exact steps.
- For Kids/Elderly: Help them find it once and note it down safely.
Troubleshooting
- MAC not visible? Make sure Wi-Fi is turned on. Restart the phone and try again.
- Different addresses shown? One is randomized (per network), another is device MAC.
- Still not found? Go to your phone manufacturer’s support website or contact customer care with your model number.
- iPhone Private Address issue: Turn it off for the specific network where you need to register.
Conclusion
Finding your mobile’s MAC address is quick and easy once you know where to look. Whether you have an Android or iPhone, it usually takes less than a minute. Keep this information handy — especially if you frequently use public or institutional Wi-Fi networks across India.
Save this article, take screenshots of your MAC address, or note it down in a safe place. Share it with friends and family who may need help registering their devices on college or office networks.
Note: Steps may vary slightly with software updates. Always refer to your device’s official user manual or support site for the most accurate instructions. Stay safe online and only use trusted sources.